CSS - narożna ramka z wykorzystaniem pseudo selektorów ::before i ::after.
Kaskadowe arkusze stylów (CSS) pozwalają na definiowanie wielu parametrów obramowania, jednak nie posiadają właściwości pozwalającej na stworzenie jedynie narożnych fragmentów ramki. Jednym ze sposobów obejścia tego ograniczenia jest zastosowanie pseudo selektorów ::before i ::after.

W celu przygotowania przykładu utworzyłem pusty plik html.
<!DOCTYPE html>
<html lang="en">
<head>
    <meta charset="UTF-8">
    <meta name="viewport" content="width=device-width, initial-scale=1.0">
    <title>Document</title>
</head>
<body>

</body>
</html>
Następnie:
- Zmieniłem tytuł strony.
- Zaimportowałem plik style.css - do niego przejdę za chwilę
- Zaimportowałem czcionkę z Google Fonts.
- Dodałem wewnątrz tagu dwa tagi
<!DOCTYPE html>
<html lang="en">
<head>
    <meta charset="UTF-8">
    <meta name="viewport" content="width=device-width, initial-scale=1.0">
    <title>Corner Border</title>
    <link rel="stylesheet" href="style.css">
    <link href="https://fonts.googleapis.com/css2?family=Roboto:wght@700&display=swap" rel="stylesheet">
</head>
<body>
    <div class="container">
        <div class="corner-border">Foo</div>
    </div>
</body>
</html>
Dla tak przygotowanego szablonu strony stworzyłem pierwszą wersję pliku style.css w celu wstępnego przygotowania układu elementów na stronie, oraz rozmiarów i kolorów poszczególnych jej elementów.
html,
body {
  height: 100%;
  width: 100%;

  margin: 0;
  padding: 0;
}

.container {
  height: 100%;
  width: 100%;

  background-color: #008ca0;

  display: flex;
  flex-direction: column;
  justify-content: center;
  align-items: center;
}

.corner-border {
  font-family: "Roboto", sans-serif;
  font-size: 64px;

  color: #ffffff;
}
Uzyskany rezultat wyglądał tak:

Po takim przygotowaniu projektu mogłem zająć się głównym tematem tego posta, czyli stworzeniem narożnego obramowania. W tym celu:
- Dla głównego elementu ustawiłem położenie względne (position: relative;) i padding.
- Stworzyłem pseudo elementy ::before i ::after pozycjonowane względem głównego elementu (position: absolute;).
- Ustaliłem położenie, rozmiar i obramowanie wybranych krawędzi pseudo elementów.
html,
body {
  height: 100%;
  width: 100%;

  margin: 0;
  padding: 0;
}

.container {
  height: 100%;
  width: 100%;

  background-color: #008ca0;

  display: flex;
  flex-direction: column;
  justify-content: center;
  align-items: center;
}

.corner-border {
  font-family: "Roboto", sans-serif;
  font-size: 64px;

  color: #ffffff;

  position: relative;
  padding: 20px 40px;
}

.corner-border::before {
  display: block;
  content: "";
  width: 30px;
  height: 30px;
  position: absolute;
  bottom: 0px;
  left: 0px;
  border-bottom: 10px solid #9e1500;
  border-left: 10px solid #00129e;
}

.corner-border::after {
  display: block;
  content: "";
  width: 30px;
  height: 30px;
  position: absolute;
  top: 0px;
  right: 0px;
  border-top: 10px solid #00129e;
  border-right: 10px solid#9e1500;
}
Zastosowanie tych stylów pozwoliło uzyskać taki rezultat:

W celu uzyskania innych obramowań należy zmodyfikować parametry pseudo elementów. Aby przedstawić dodatkowe przykłady edytowałem plik html dodając dwa nowe elementy.
<!DOCTYPE html>
<html lang="en">
<head>
    <meta charset="UTF-8">
    <meta name="viewport" content="width=device-width, initial-scale=1.0">
    <title>Corner Border</title>
    <link rel="stylesheet" href="style.css">
    <link href="https://fonts.googleapis.com/css2?family=Roboto:wght@700&display=swap" rel="stylesheet">
</head>
<body>
    <div class="container">
        <div class="corner-border foo">Foo</div>
        <div class="corner-border bar">Bar</div>
        <div class="corner-border baz">Baz</div>
    </div>
</body>
</html>
Do zmienionego pliku html przystosowałem arkusz stylów aktualizując style pierwszego elementu (Foo) i dodając nowe style dla elementów Bar i Baz.
html,
body {
  height: 100%;
  width: 100%;

  margin: 0;
  padding: 0;
}

.container {
  height: 100%;
  width: 100%;

  background-color: #008ca0;

  display: flex;
  flex-direction: column;
  justify-content: center;
  align-items: center;
}

.corner-border {
  font-family: "Roboto", sans-serif;
  font-size: 64px;

  color: #ffffff;

  position: relative;
  padding: 20px 40px;
  margin: 20px;
}

.corner-border::before {
  display: block;
  content: "";
  position: absolute;

}

.corner-border::after {
  display: block;
  content: "";
  position: absolute;


}

/* FOO */
.foo::before {
  bottom: 0px;
  left: 0px;

  width: 30px;
  height: 30px;

  border-bottom: 10px solid #9e1500;
  border-left: 10px solid #00129e;
}

.foo::after {
  top: 0px;
  right: 0px;

  width: 30px;
  height: 30px;

  border-top: 10px solid #00129e;
  border-right: 10px solid #9e1500;
}

/* BAR */
.bar::before {
  bottom: 0px;
  left: 0px;

  width: 30px;
  height: 20px;

  border-bottom: 10px solid #9e1500;
  border-left: 10px solid #9e1500;
}

.bar::after {
  bottom: 0px;
  right: 0px;

  width: 30px;
  height: 20px;

  border-bottom: 10px solid #9e1500;
  border-right: 10px solid #9e1500;
}

/* BAZ */
.baz::before {
  bottom: 0px;
  left: 0px;

  width: 20px;
  height: 20px;

  border-top: 5px solid #00129e;
  border-right: 5px solid#9e1500;
}

.baz::after {
  top: 0px;
  right: 0px;

  width: 20px;
  height: 20px;

  border-bottom: 5px solid #9e1500;
  border-left: 5px solid #00129e;
}
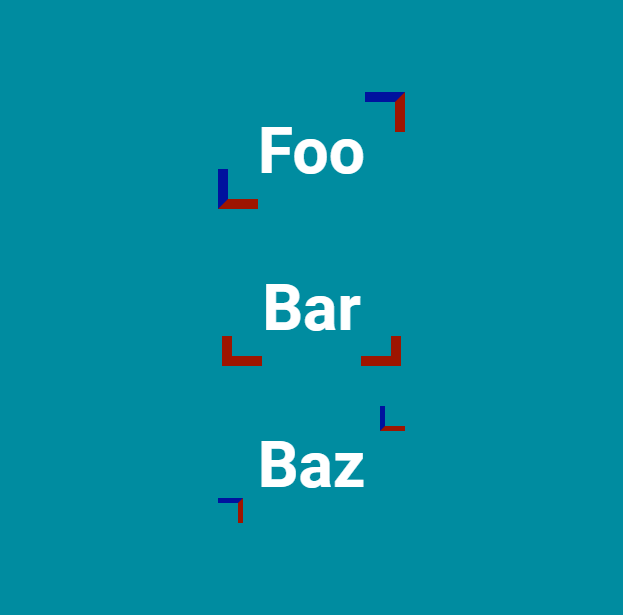
W przypadku tych stylów rezultaty wyglądają następująco:

Dla tak przygotowanych obramowań postanowiłem dodać proste animacje wyzwalane po najechaniu na element. W tym celu po najechaniu na element główny modyfikowałem właściwości jego pseudo elementów (np. .foo:hover::before). W celu zapewnienia płynniejszej animacji zdefiniowałem przejścia dla modyfikowanych właściwości (np. transition: all 0.5s ease-in; ).
html,
body {
  height: 100%;
  width: 100%;

  margin: 0;
  padding: 0;
}

.container {
  height: 100%;
  width: 100%;

  background-color: #008ca0;

  display: flex;
  flex-direction: column;
  justify-content: center;
  align-items: center;
}

.corner-border {
  font-family: "Roboto", sans-serif;
  font-size: 64px;

  color: #ffffff;

  position: relative;
  padding: 20px 40px;
  margin: 20px;
}

.corner-border::before {
  display: block;
  content: "";
  position: absolute;
}

.corner-border::after {
  display: block;
  content: "";
  position: absolute;
}

/* FOO */
.foo::before {
  bottom: 0px;
  left: 0px;

  width: 30px;
  height: 30px;

  border-bottom: 10px solid #9e1500;
  border-left: 10px solid #00129e;
  transition: all 0.5s ease-out;
}

.foo::after {
  top: 0px;
  right: 0px;

  width: 30px;
  height: 30px;

  border-top: 10px solid #00129e;
  border-right: 10px solid#9e1500;

  transition: all 0.5s ease-out;
}

.foo:hover::before,
.foo:hover::after {
  width: calc(100% - 10px);
  height: calc(100% - 10px);

  transition: all 0.5s ease-in;
}

/* BAR */
.bar::before {
  bottom: 0px;
  left: 0px;

  width: 30px;
  height: 20px;

  border-bottom: 10px solid #9e1500;
  border-left: 10px solid #9e1500;

  transition: bottom 0.4s ease-out, width 0.5s 0.2s ease-out;
}

.bar::after {
  bottom: 0px;
  right: 0px;

  width: 30px;
  height: 20px;

  border-bottom: 10px solid #9e1500;
  border-right: 10px solid #9e1500;

  transition: bottom 0.4s ease-out, width 0.5s 0.2s ease-out;
}

.bar:hover::before,
.bar:hover::after {
  width: calc(100% - 10px);
  bottom: 15px;

  transition: width 0.5s ease-in, bottom 0.3s 0.3s ease-in;
}

/* BAZ */
.baz::before {
  bottom: 0px;
  left: 0px;

  width: 20px;
  height: 20px;

  border-top: 5px solid #00129e;
  border-right: 5px solid#9e1500;

  transition: bottom 0.5s ease-out, left 0.5s ease-out,
    transform 0.5s 0.2s ease-out;
}

.baz:hover::before {
  transform: rotate(180deg);
  bottom: 20px;
  left: 20px;

  transition: transform 0.5s ease-in, bottom 0.5s 0.3s ease-in,
    left 0.5s 0.3s ease-in;
}

.baz::after {
  top: 0px;
  right: 0px;

  width: 20px;
  height: 20px;

  border-bottom: 5px solid #9e1500;
  border-left: 5px solid #00129e;

  transition: top 0.5s ease-out, right 0.5s ease-out,
    transform 0.5s 0.2s ease-out;
}

.baz:hover::after {
  transform: rotate(180deg);
  top: 20px;
  right: 20px;

  transition: transform 0.5s ease-in, top 0.5s 0.3s ease-in,
    right 0.5s 0.3s ease-in;
}
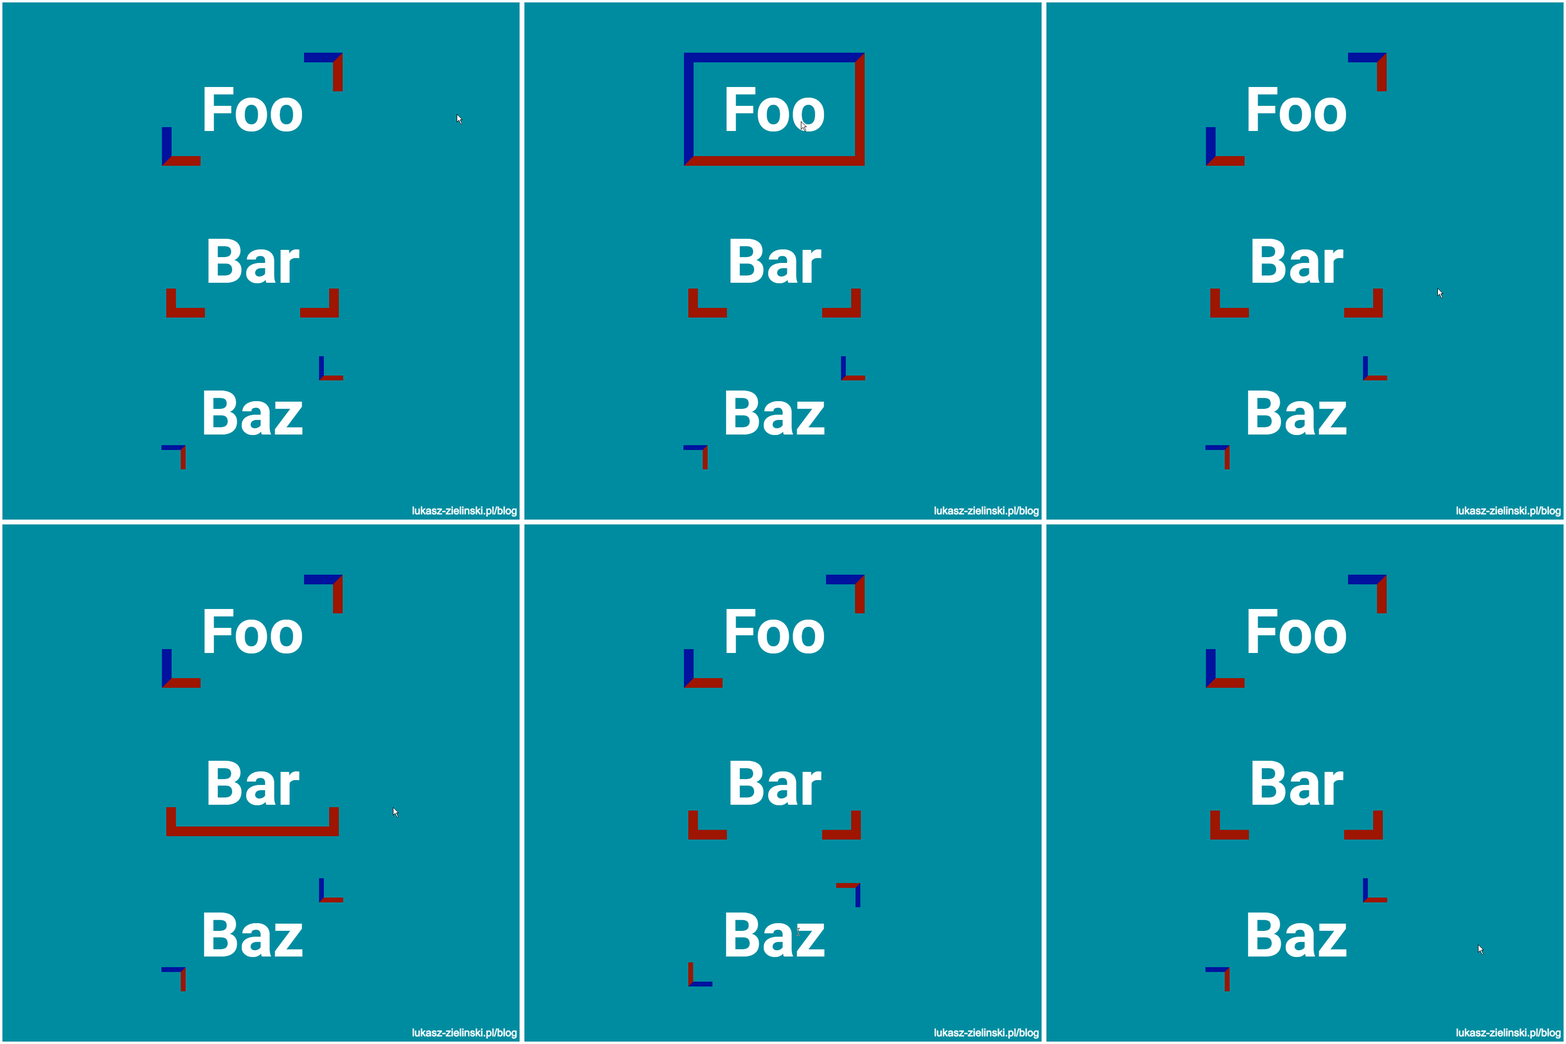
Ostatecznie uzyskany rezultat wygląda tak:

Źródło: Stackoverflow